Using Your Snowshoes & Poles
Some tips on using your Bigfoot Snowshoes and poles! Also, see our
Before You Buy section for information that may be helpful when buying our snowshoes and poles
Putting Your Snowshoes On
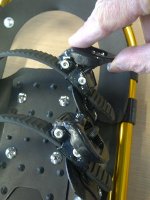
- Your snowshoes have a left & right. Buckles go to the outside
- Place your boot or shoe on the binding so that the ball (widest part) of your foot is over the pivot strap or bar
- It's easiest if you keep the ends of the toe & instep straps threaded through the ratchet buckle. Try not to pull the straps completely out of the buckles
- Tighten the ratchet buckles by lifting up on the bottom part of the buckle. You can hear the ratchet click as it tightens
- Tighten the toe ratchet strap and then the instep ratchet strap. These just need to be snug. Don't over tighten them
- Once you've snapped the heel strap buckle together, pull the heel strap until the rubber heel band is snug against your heel. If you have a small shoe size, you may need to slide the heel band towards the inside of the strap so you have room to tighten the strap. Again, just make this strap snug
Heading Off
- After you've taken about 50 steps, your boots will have settled into the bindings. Check your ratchet and heel straps and, if necessary, snug them up. Don't over tighten them
- Keep in mind that your snowshoes add a few inches to your footprint width. Be conscious of the width and be careful that you don't step on your own snowshoes or clank them on each other. If you find that you're stepping on your own snowshoes frequently, you can temporarily put duct tape along the inside tubes & platform straps of each snowshoe to protect them until you've developed a stride that allows for the added snowshoe width
- Your crampons are made of heavy gauge aluminum and although they will stand up to any snow conditions, they are not designed for walking on asphalt, rocks or solid ice. If you do have to cross a road or a frozen lake, take your snowshoes off. If you do find that your crampons have been bent, you can use vise-grips to carefully bend them back to their proper position.
- Be particularly cautious when you're walking on terrain you're not familiar with. Your snowshoes are very strong, but they are not made to carry your weight if they are acting as a bridge with only the tip and the tail on solid ground
When You're Done
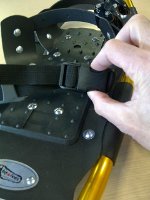
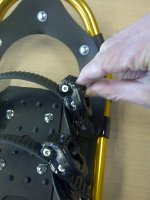
- Just pinch the tongue against the ratchet buckle to release your toe & instep straps. Again, it's easiest if you keep the ends of the straps in the buckles so you don't have to thread them into the buckles each time you use your Bigfoot Snowshoes
- Pinching the sides of the heel strap buckle will release it. With the toe & instep straps loosened and the heel strap open, your boot should easily slide out of the binding
- Don't forget to dry your snowshoes and poles off before you put them away. Your carry bags will help keep your equipment organized and protect things from your crampons!
Some Additional Tips
- If you give your snowshoes a few minutes to cool down before you put them on the snow you won't end up with snow & ice freezing to them. As well, if you’re going to be heading out in sticky snow, spray some PAM cooking spray on your crampons to help them shed snow.
- After you’ve used your Bigfoot Snowshoes a few times, it’s a good idea to check that the bolts holding the crampons to the binding have remained snug. There is a plastic sleeve in the nuts that helps to keep them from loosening, but they can be jarred loose
- Snowshoeing is great exercise! You'll probably find that after 10-20 minutes, you're a lot warmer than when you started. It's best to dress in layers so that you can adjust your dress to suit the weather and your activity level
- If you're heading into very deep snow, you might consider gaiters to keep snow out of your boots or shoes
- If your toe and/or instep straps are too long, you can shorten them by cutting the end off. Keep in mind that you want them long enough so they don't pull out of the buckles when you undo them. Also, if you cut them so they are rounded, they are easier to thread into the buckle if you need to
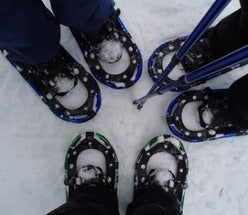
What About Your Poles?
-
Click here to view our video on adjusting the length of your poles
- Set your pole length so your forearm is horizontal when you're holding the handle and your upper arm is hanging vertically beside your body
- As you're moving about, you can lengthen or shorten your poles to suit your preferences and/or the terrain. For example, if you're about to start a long climb, you may wish to shorten your poles a bit. Or, if you've got a long side hill trek, you may want to adjust your poles so the up hill one is a little shorter than you'd normally have it and your down hill pole is a little longer than normal
- Ensure your baskets are screwed on snugly. You can also use Loctite or plumber's tape to keep them on more securely
- Poles come with 2 sets of baskets – a small one for packed snow and a large one for deeper, fluffier snow
- Poles are great for walking or hiking during the summer months as well
- Poles come with 2 sets of walking tips. The angled one is a nordic walking tip and is ideal for aggressive hiking. Either set of tips will work on city streets or hard/rocky ground. The tips also serve as a protective end for your poles for storage and transportation
- For hiking or snowshoeing, just use your poles without tips
- If your pole sections won’t tighten, the tightening mechanism may be frozen. The first step is to attempt to tighten the tubes by rotating them for at least 10 seconds. If they still won’t tighten, pull the pole sections completely apart and you’ll see the plastic tightening mechanism held on the pole piece by a hexagonal nut. Unscrew the locking mechanism from the hexagonal nut about 1/16 of a turn. When you put the pieces back together, the tightening mechanism should work properly now.
For a list of great places to snowshoe and discover, click here!


